I've received at home a copy of ACM XRDS Magazine, and wow!!!, it's really impressive one issue treated there. The article name is "Interfaces on the Go".
As I said, I got shocked 'cause it's something I never expected, Microsoft and Canergie Mellon's HCI Institute have been hard working in this research. I see that Microsoft is more than just Windows OS'es and Office software.
There's one new concept that it's being introduced, micro-interactions that refers to interactions that take a lower time to initiate and complete (tipically lesser than 4 seconds, this time it's to compare with interaction with cellphones or similar devices interaction), so that the user can quickly return to the task at hand. There are a couple of techniques that are being developed:
Muscle-computer interfaces.
Bio-acustic sensing.
Most impressive technique to me is Bio-acustic sensing 'cause it's a technique that allows the skin (yes!!, the skin) to be used as a finger input surface, that's why it's name is Skinput. Regardless of it it seems that it's better to understand an image rather than a speech.
Please forgive me if I have misspellings, I'm just trying to improve my English so I decided start posting in this language.
Original source: XRDS Magazine, summer 2010 issue 16.4
Now that I'm "fan" of linux.com via facebook, I saw this little tuto regarding to "Block Traffic", I just decided to post it 'cause already I'm Network Manager and I might use this information in not so far future. Well here comes post.
Packetfence is a very powerful Network Access Control tool. Using Packetfence you can control and block unwanted traffic on your network. Want to block P2P services like BitTorrent, or keep mobile devices like iPhones and Android phones off your wireless network? Packetfence gives you the kind of fine-grained control you're looking for. Packetfence is officially supported on Red Hat Enterprise Linux (RHEL) and CentOS. With those two distributions you can quickly get Packetfence up and running (Unlike on Ubuntu which I recently outlined in "Install and Configure Packetfence on Ubuntu Linux"). But you are not relegated to command line only (as you will find in Ubuntu). With Red Hat or CentOS you will find a powerful web-based tool at your fingertips. With this tool you can easily manage Packetfence. But not all aspects of Packetfence can be handled from the web-based GUI. Assumptions What I want to demonstrate is how to block specific traffic on your Packetfence-enabled network. I will assume just a few items: You already have Packetfence installed and working properly (I will be demonstrating on CentOS 5) You have administrative rights to the machine Packetfence is installed on. That's all. I am going to demonstrate how to block two types of traffic. First I am going to demonstrate how to block P2P traffic (such as Limewire) which will be followed by how to block iPhone/Android phone access to your network. Adding the Final Piece: Snort In order for Packetfence to block specific services or devices you have to enlist the help of Snort. Snort is a network intrusion detection system. In order to install Snort, follow these steps:
Open up a terminal window.
su to the root user or use sudo.
Issue the command yum install snort
With Snort installed you are almost ready. However, you will need to get rules so that Snort knows what is an intrusion. By default Snort installs without any rules. In order to add rules you have two options:
Write your own rules.
Download and install pre-configured rules from the Snort Website
I highly recommend you opt for the latter (as writing your own rules will take a lot of time and effort). To do this you will need to register on the Snort web site. You can sign up for the free account and still download rules. Once you have signed up and activated your account, download the rules and then follow these steps:
Open up a terminal window.
Change to the directory the snortrules-snapshot-XXX.tar.gz file was downloaded to (Where XXX is the release number that matches the Snort release installed on your machine.)
Issue the command tar xvzf snortrules-snapshot-XXX.tar.gz (Where XXX is the release number).
Change into the newly created rules folder.
Issue the command cp * /etc/snort/rules/
You now have all the rules you need for Snort to work. Start up Snort with the command /etc/rc.d/init.d/snortd start. You should now see /var/log/messages starting to fill up with information from Snort. Now it's time to re-configure Packetfence. Enable Snort Since you just added Snort, you need to make Packetfence aware. To do this open up the /usr/local/pf/conf/pf.conf file and add the following: [services]
snort=/usr/sbin/snort Save the file and restart Packetfence with the command /usr/local/pf/bin/pfcmd service pf restart — Packetfence is now using Snort. Choosing the Correct Template Before we can get into the actual configuration and blocking of services/devices, we first have to re-configure Packetfence to run in a mode other than testing. In the first article I illustrated how to configure and start Packetfence in testing mode. This is great for making sure things are working as Packetfence will only log events (not act upon them). In order to get Packetfence to actually act upon a violation, you have to reconfigure it to run using a different template. The templates you can choose from are:
Test mode
Registration
Detection
Registration & Detection
Registration, Detection & Scanning
Session-based Authentication
The template you want to choose is Registration, Detection & Scanning. In order to do that open up a terminal window and do the following:
su to the root user.
Change to the /usr/local/pf directory.
Issue the command ./configurator.pl .
Select option [5] for Registration, Detection & Scanning.
Answer all of the questions (this will be similar to your initial installation, as shown in the first article).
Now cd into the /usr/local/pf/bin directory.
Issue the command ./pfcmd service pf restart.
Packetfence is now working in the proper mode to act against violations. However, it doesn't know what is a violation. For that we have to turn to the /usr/local/pf/violations.conf file. Enabling Specific Violations In the violations.conf file you will see a long laundry list of violations. Each violation section looks like: [2000334]
desc=P2P (BitTorrent)
priority=8
url=/content/index.php?template=p2p
disable=Y
max_enable=1
trigger=Detect::2000334,Detect::2000357,Detect::2000369 The above violation is for BitTorrent connections. As you can see this violation, in its default state, is disabled. To enable this violation all you need to do is change the line: disable=Y to disable=N You will find, listed in the violations, the P2P violation and the Android device violation. Enable both of those, save the file, and restart Packetfence. Now, any device that violates the enabled violations will be denied access and will be logged. Web Interface
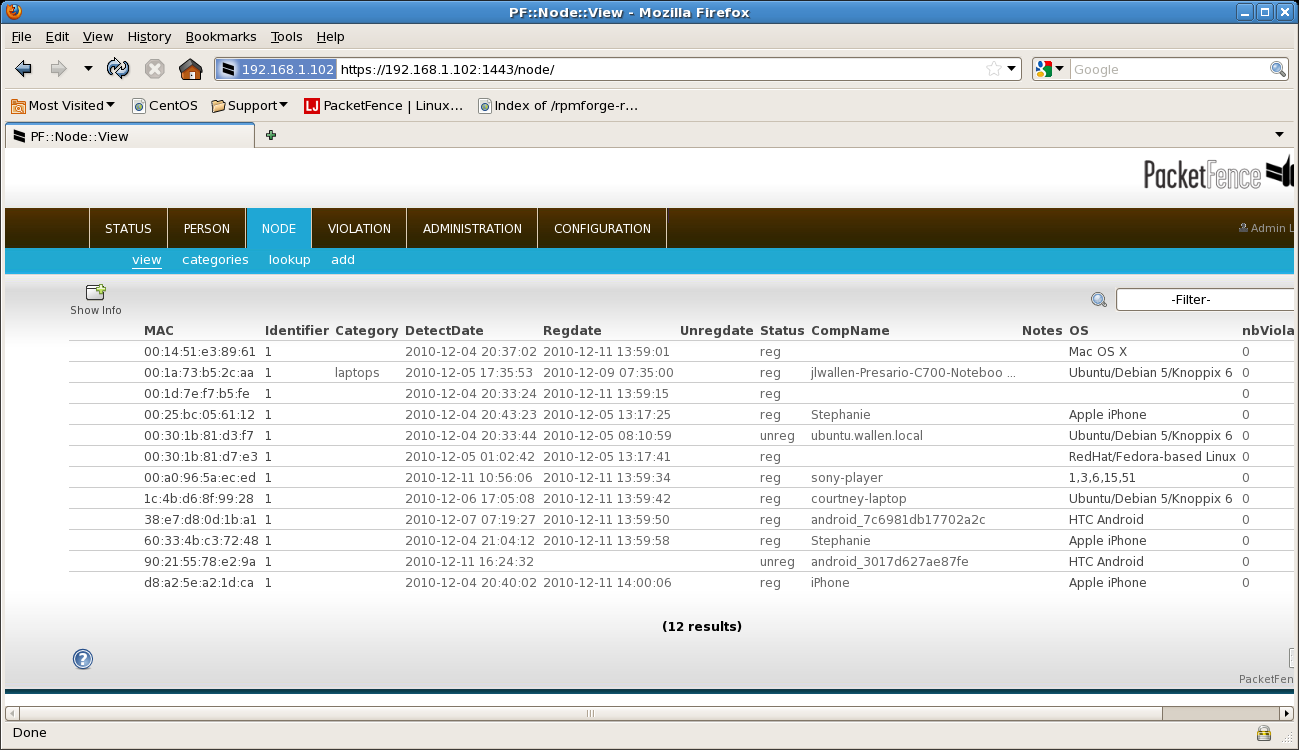
As I mentioned, Packetfence does come with a spiffy Web interface that allows you to manage your Packetfence-protected network. To access this tool open up your browser and point it to https://ADDRESS_TO_SERVER:1443. When you arrive at this site you will have to log in with your admin credentials (configured during installation of Packetfence). Upon successful authentication you will find yourself at the Packetfence web interface (see Figure 1). Here you can manager each node on your network, add users (for authentication), start/stop various pieces of Packetfence, and configure Packetfence. From the Violation tab you can even enable/disable violations using a simple drop-down to select the particular violation you want to enable. Final Thoughts
As far as Network Access Control goes, you will be hard-pressed to find a more powerful tool than Packetfence. Not only is it powerful, but once installed and configured it is easy to administer and manage. Of course, there is so much more that can be done with Packetfence. For more information read through the outstanding guides offered on the Packetfence Documentation page.
There are many times that pople usually ask us if we can bring back their data from a hard disk (or any storage device), 'cause they "accidentally" deleted it. Uf!!! that really piss me off.
Surfing I've found a pair of free and open software that might help us to solve that:
PhotoRec is file data recovery software designed to recover lost files including video, documents and archives from hard disks, CD-ROMs, and lost pictures (thus the Photo Recovery name) from digital camera memory. PhotoRec ignores the file system and goes after the underlying data, so it will still work even if your media's file system has been severely damaged or reformatted.
TestDisk is powerful free data recovery software! It was primarily designed to help recover lost partitions and/or make non-booting disks bootable again when these symptoms are caused by faulty software, certain types of viruses or human error (such as accidentally deleting a Partition Table). Partition table recovery using TestDisk is really easy.
Both software can run trough a variety of operating systems, this is the most important issue because there are many programs that only run under Windows platforms consequently FAT and NTFS are only supported file systems, this is something that you don't have to experiment because supported file systems in Photorec and/or TestDisk are:
BeFS ( BeOS )
BSD disklabel ( FreeBSD/OpenBSD/NetBSD )
CramFS, Compressed File System
DOS/Windows FAT12, FAT16 and FAT32
Windows exFAT
HFS, HFS+ and HFSX, Hierarchical File System
JFS, IBM's Journaled File System
Linux ext2, ext3 and ext4
Linux LUKS encrypted partition
Linux RAID md 0.9/1.0/1.1/1.2
-RAID 1: mirroring
-RAID 4: striped array with parity device
-RAID 5: striped array with distributed parity information
-RAID 6: striped array with distributed dual redundancy information
Linux Swap (versions 1 and 2)
LVM and LVM2, Linux Logical Volume Manager
Mac partition map
Novell Storage Services NSS
NTFS ( Windows NT/2000/XP/2003/Vista/2008/7 )
ReiserFS 3.5, 3.6 and 4
Sun Solaris i386 disklabel
Unix File System UFS and UFS2 (Sun/BSD/...)
XFS, SGI's Journaled File System
Need more details?? You can download for free here.
Como es acostumbrado aquí dejo el material del curso avanzado de redes con tecnología cisco impartido por mi en las instalaciones de cluster.
Si alguien tiene algún comentario por favor postearlo.
Si alguien más desea descargar el material, sépase que no tiene las prácticas, únicamente tiene un caso de integración que deberá resolverse al final de este módulo.